Dec 28, 2015

エクストリーム・ネットワークス : MLAG (XOS) / Two-Tier

このポストでは、Two - Tier の MLAG の設定について、ご紹介したいと思います。
また、Two-Tier のトポロジーは、下記となります。


Two-Tier の設定に関しては、基本的に Single-Tier と同じでございます。
ただし、Two-Tierは、下記の2 点設定を追加します。

//1. スイッチ間 LAG を設定する//

Static LAGの場合: 
enable sharing grouping algorithm address-based  

LACP LAGの場合: 

enable sharing grouping algorithm address-based lacp


//2. LAG port の MLAG をenable する//
enable mlag port peer id


設定例

左側のMLAG PEER - I のスイッチ
create vlan isc
configure vlan isc tag 10
configure vlan isc add ports 1 tagged
configure vlan isc ipaddress 198.51.100.1/30
create mlag peer right
configure mlag peer right ipaddress 198.51.100.2 
enable sharing 2 grouping 2,3 algorithm address-based l3_l4 lacp 
enable mlag port 2 peer right id 200


右側のMLAG PEER - I のスイッチ
create vlan isc
configure vlan isc tag 10
configure vlan isc add ports 1 tagged
configure vlan isc ipaddress 198.51.100.2/30
create mlag peer left
configure mlag peer left ipaddress 198.51.100.1 
enable sharing 2 grouping 2,3 algorithm address-based l3_l4 lacp 
enable mlag port 2 peer left id 200


左側のMLAG PEER - II のスイッチ
create vlan isc
configure vlan isc tag 20
configure vlan isc add ports 1 tagged
configure vlan isc ipaddress 198.51.100.5/30
create mlag peer top-right
configure mlag peer top-right ipaddress 198.51.100.6
enable sharing 2 grouping 2,3 algorithm address-based l3_l4 lacp 
enable mlag port 2 peer top-right id 300


右側のMLAG PEER - II のスイッチ
create vlan isc
configure vlan isc tag 20
configure vlan isc add ports 1 tagged
configure vlan isc ipaddress 198.51.100.6/30
create mlag peer top-left
configure mlag peer top-left ipaddress 198.51.100.5
enable sharing 2 grouping 2,3 algorithm address-based l3_l4 lacp 
enable mlag port 2 peer top-left id 300


参考URL
https://gtacknowledge.extremenetworks.com/articles/How_To/Sample-configuration-for-two-tier-MLAG

エクストリーム・ネットワークス : MLAG (XOS) /Single-Tier

このポストでは、Single - Tier の MLAG の設定について、ご紹介したいと思います。
また、Single-Tier のトポロジーは、下記となります。


// Step 1. ISC の vlan を設定する //
create vlan
configure vlan tag
configure vlan add ports tagged
configure vlan ipaddress

また、MLAG Peer 間のLink は LAG を設定することがおすすめでございます。


// Step 2. MLAG Peer を設定する//
create mlag peer
configure mlag peer ipaddress  


// Step 3 MLAG Peer をenableする//
enable mlag port peer id

MLAG peer 間の MLAG ID は、同一でございます。


左側 MLAG の設定例
create vlan isc
configure vlan isc tag 10
configure vlan isc add ports 1 tagged
configure vlan isc ipaddress 198.51.100.1/30
create mlag peer right 
configure mlag peer right ipaddress 198.51.100.2
enable mlag port 2 peer right id 100

右側MLAG の設定例

create vlan isc
configure vlan isc tag 10
configure vlan isc add ports 1 tagged
configure vlan isc ipaddress 198.51.100.2/30
create mlag peer left
configure mlag peer left ipaddress 198.51.100.1
enable mlag port 2 peer left id 100


参考URL

https://gtacknowledge.extremenetworks.com/articles/How_To/How-to-configure-MLAG-in-Extreme-switches


エクストリーム・ネットワークス : MLAG (XOS) - 1

これからの3つポストは、エクストリーム・ネットワークスの MLAG の紹介及び設定方法について、ご説明したいと思います。

MLAG は Multi-switch Link Aggregation Group の略でございます。
MLAG の利点は、Uplink の bandwidth を有効的利用できると考えられます。説明するためには、下記の2つ 図(Non-MLAG.png  と MLAG.png)をご覧ください。


1.  Non - MLAG.png

No-MLAG.png のように、MLAG の技術を利用しない場合、ネットワークのループを防止するため、STP の技術で Access SW1 と Access SW2 の上記のport は block されると考えられます。

したがって、Access SW 1からのPacket Flow は上記の図ようになります。
つまり、Block された Uplink の bandwidth を利用していないです。


2. MLAG.png

一方、MLAG の技術を利用している場合、Access SW1からのPacket Flow は、上記のようになります。つまり、Access SW 1 の すべてUplink を利用できます。

また、ISC の Block Filter の機能を利用し、ネットワークのループを防止できます。


なお、MLAG の詳細について、下記のURL をご参照ください。
http://documentation.extremenetworks.com/exos/EXOS_All/Slots_and_Ports/c_mlag.shtml

Dec 21, 2015

エクストリーム・ネットワークス:NAC のインストール

このポストでは、エクストリーム・ネットワークスのNetwork Access Control (NAC) のインストールについて、ご紹介したいと思います。

 // 手順 //
1. Appliance をdownload する
 1.a )  http://www.extremenetworks.com/support/software へアクセス
 1.b)   リダイレクトされたPage にユーザー名とパスワードを入力する
 1.c)   利用したいNetSight Software を Click する ※ 
 1.d)    展開された Window から ご利用したいNAC appliance を Download 
     (本ポストでは、OVA をdownload します。)
※ 現在、NAC  の Appliance はNetSight に含まれる。


2.  VM マシンに download した OVA ファイルを展開する


3. 名前を変更する


4. 通常の通り、OVA ファイルをインストールし、該当のVM をPower on する


5. NAC Appliance を起動後、”root” でログインする


6. 新しい パスワードを作成する


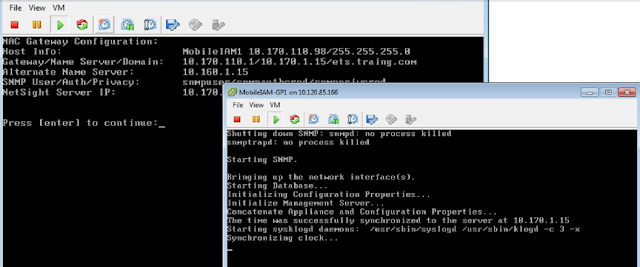
7. NAC Script を入力する


8.  SNMP を設定する
 

9. NTP を設定する


10. 設定された内容を確認する


参考URL
https://extranet.extremenetworks.com/downloads/Pages/dms.ashx?download=c20dcce1-73f0-414e-8d52-10826bfa320d

Dec 17, 2015

エクストリーム・ネットワークス:EASP(XOS)

このポストでは、エクストリーム・ネットワークスのスイッチ(XOS)についてご紹介したいです。

今回、ご利用しているトポロジーは下記となります。


EAPS のコンフィグは、下記の5つのステップがございます。
1.  EAPS control vlan を設定する
2.  EAPS protected vlan を設定する
3.  EAPS domain を設定する
4.  control vlan と protected vlan にポートをアサインする
5.  EAPS を enable する


//1.  EAPS のcontrol vlan を設定する//
create vlan <control_vlan_name>
configure vlan <control_vlan_name> tag <vlan_tag>
configure vlan <control_vlan_name> add port <primary_port_#> tagged
configure vlan <control_vlan_name> add port <secondary_port_#> tagged

//2.  EAPS のprotected vlan を設定する//
create vlan <protected_vlan_name>
configure vlan <protected_vlan_name> tag <vlan_tag>
configure vlan <protected_vlan_name> add port <primary_port_#> tagged
configure vlan <protected_vlan_name> add port<secondary_port_#> tagged

//3.  EAPS domain を設定する//
create eaps
configure eaps mode master 
configure eaps mode transit 

//4.  EAPS のcontrol vlan と protected vlan にポートをアサインする//
configure eaps primary port

configure eaps secondary port
configure eaps <name> add control vlan <control_vlan_name>
configure eaps <name> add protect vlan <protected_vlan_name>

//5.  EAPS を enable する//
enable eaps
enable eaps <name>
configure eaps fast-convergence [off | on]


#### Master node の SW480 のコンフィグ例 ####
#
# Module eaps configuration.
#
configure eaps fast-convergence on
enable eaps
create eaps ED
configure eaps ED mode master
configure eaps ED primary port 3
configure eaps ED secondary port 2
enable eaps ED
configure eaps ED add protected vlan Data
configure eaps ED add control vlan Contr
####


// EAPS を確認する //
* X480-24x(10G4X).3 # show eaps detail

EAPS Enabled: Yes
EAPS Fast-Convergence: On
EAPS Display Config Warnings: On
EAPS Multicast Add Ring Ports: Off
EAPS Multicast Send IGMP and MLD Query: On
EAPS Multicast Temporary Flooding: Off
EAPS Multicast Temporary Flooding Duration: 15 sec
Number of EAPS instances: 1

  Name: ED                                      Priority: Normal
  State: Complete                               Running: Yes
  Enabled: Yes    Mode: Master
  Primary port:   3             Port status: Up Tag status: Tagged
  Secondary port: 2             Port status: Blocked    Tag status: Tagged
  Hello Egress Port: Primary
  Hello timer interval: 1  sec  0  millisec
  Fail timer interval:  3  sec  0  millisec
  Fail Timer expiry action: Send alert
  Last update: From Master Id 00:04:96:51:94:55, at Tue Dec 15 19:11:07 2015
  EAPS Domain has following Controller Vlan:
    Vlan Name                    VID
    Contr                        11
  EAPS Domain has following Protected Vlan(s):
    Vlan Name                    VID
    Data                         61
  Number of Protected Vlans: 1


Dec 10, 2015

エクストリーム・ネットワークス: LACP (XOS)

このポストでは、エクストリーム・スイッチ(XOS) のLACP (Link Aggregation Control Protocol) の設定方法について、ご紹介したいです。


まず今回のトポロジーを説明させてください。

+++++++++++[port 3] <-----> [port 3]+++++++++++
+   SwitchA   +                                      +   SwitchB   +
+++++++++++[port 4] <-----> [port 4]+++++++++++

SwitchA の Port 3 と Port 4 で LACP を実施します。


###### 実行事例 #######
// Switch A と Switch B で、下記のコマンドを実施する //

//Switch A//
* X480-24x(10G4X).4 # enable sharing 3 grouping 3, 4 algorithm address-based lacp

//Switch B//
* X480-24x(10G4X).4 # enable sharing 3 grouping 3, 4 algorithm address-based lacp

//Switch A//
* X480-24x(10G4X).6 # enable ports 3-4

//Switch B//
* X480-24x(10G4X).6 # enable ports 3-4

// 確認するコマンドSwitch A//
* X480-24x(10G4X).7 # show sharing
Load Sharing Monitor
Config    Current    Agg       Ld Share    Ld Share  Agg   Link    Link Up
Master    Master     Control   Algorithm   Group     Mbr   State   Transitions
==============================================================================
     3      3        LACP      L2          3          Y      A        4
                               L2          4          Y      A        3
==============================================================================
Link State: A-Active, D-Disabled, R-Ready, NP-Port not present, L-Loopback
Load Sharing Algorithm: (L2) Layer 2 address based, (L3) Layer 3 address based
                        (L3_L4) Layer 3 address and Layer 4 port based
                        (custom) User-selected address-based configuration
Custom Algorithm Configuration: ipv4 L3-and-L4, xor
Number of load sharing trunks: 1

// 確認するコマンドSwitch B//
* X480-24x.5 # show sharing
Load Sharing Monitor
Config    Current Agg     Min     Ld Share    Ld Share  Agg   Link   Link Up
Master    Master  Control Active  Algorithm   Group     Mbr   State  Transitions
================================================================================
     3      3     LACP       1     L2          3          Y      A        2
                                   L2          4          Y      A        3
================================================================================
Link State: A-Active, D-Disabled, R-Ready, NP-Port not present, L-Loopback
Minimum Active: (<) Group is down. # active links less than configured minimum
Load Sharing Algorithm: (L2) Layer 2 address based, (L3) Layer 3 address based
                        (L3_L4) Layer 3 address and Layer 4 port based
                        (custom) User-selected address-based configuration
Custom Algorithm Configuration: ipv4 L3-and-L4, xor
Number of load sharing trunks: 1
######

Dec 9, 2015

エクストリーム・ネットワークス:診断テスト(XOS)

このポストでは、エクストリーム・ネットワークスのスイッチの診断テスト(Diagnostic Test) についてご紹介したいです。
診断テストのゴールドは、該当機器の故障の減少と適切な故障の報告となります。

下記の機器で、診断テストの実行ができます。
 - Summit family Switch
 - BlackDiamond
 - EXOS


実施する方法
 - run diagnostics [extended | normal | stack-port] {slot [ | A | B]}


######## 実施例 #######
X480-48t.1.17.43 # run diagnostics normal

Running Diagnostics will disrupt network traffic. Are you sure you want to continue? (y/N) Yes

Do you want to save configuration changes to currently selected configuration
file (mgmt-labswA.cfg)? (y or n) Yes
Saving configuration on master ........ done!
X480-48t.1.17.44 #
X480-48t.1.17.44 > The system is gSending SIGKILL to all processes
Requesting system reboot

Extreme Networks
Alternate BootStrap Image
Starting CRC of Default image
Using Default image ...

Extreme Networks
Default BootLoader Image
DRAM Post

Press and hold the to enter the bootrom.
Copyright 2003 - 2009 Extreme Networks, Inc.

Loading EXOS Diagnostics ... |/
Running Image ...
Secondary Core Initializing ...
Decompressing diagnostics...

Initializing operational diagnostics...
Running Power On Self Test...(Normal mode)
Test i2cenviron                   - PASS
Test nvram                        - PASS
Test internal compact flash       - PASS
Test sdram                        - PASS
Test loopback eth                 - PASS
Test loopback pci                 - PASS
Test loopback mac interface       - PASS
Test loopback phy copper          - PASS
Test loopback phy fiber           - PASS
Test snake interface              - PASS
Test sync ethernet                - PASS
Test external tcam                - PASS
Test asic0 reg                    - PASS
Test asic0 mac                    - PASS

Storing diagnostics result into EEPROM.
Diagnostics completed.
Waiting for reboot...Restarting system.

Extreme Networks
Alternate BootStrap Image
Starting CRC of Default image
Using Default image ...

Extreme Networks
Default BootLoader Image
DRAM Post
########

参考URL
This information was found in page 409-412 of ExtremeXOS Concepts Guide, Software Version 12.5 Rev. 03

Dec 7, 2015

エクストリーム・ネットワークス:Vlan のSecurity(XOS)

エクストリーム・ネットワークス(XOS)をご利用している場合、デフォルトですべてPort がDefault Vlan 1 にアサインします。つまり、Vlan 1 にアサインされた Active Port は Security hole になる可能性があります。 Best Practice のため、すべてのPort は Default vlan から削除することができます。

### 例 ####


* X480-48t.1.17.36 #
* X480-48t.1.17.36 # show vlan default
VLAN Interface with name Default created by user
    Admin State:         Enabled     Tagging:   802.1Q Tag 1
    Description:         None
    Virtual router:      VR-Default
    IPv4 Forwarding:     Disabled
    IPv4 MC Forwarding:  Disabled
    Primary IP:          172.16.1.103/24
    IPv6 Forwarding:     Disabled
    IPv6 MC Forwarding:  Disabled
    IPv6:                None
    STPD:                s0(Disabled,Auto-bind)
    Protocol:            Match all unfiltered protocols
    Loopback:            Disabled
    NetLogin:            Disabled
    OpenFlow:            Disabled
    TRILL:               Disabled
    QosProfile:          None configured
    Egress Rate Limit Designated Port: None configured
    Flood Rate Limit QosProfile:       None configured
    Ports:   48.          (Number of active ports=0)
       Untag:      !1,     !2,     !3,     !4,     !5,     !6,     !7,
                   !8,     !9,    !10,    !11,    !12,    !13,    !14,
                  !15,    !16,    !17,    !18,    !19,    !20,    !21,
                  !22,    !23,    !24,    !25,    !26,    !27,    !28,
                  !29,    !30,    !31,    !32,    !33,    !34,    !35,
                  !36,    !37,    !38,    !39,    !40,    !41,    !42,
                  !43,    !44,    !45,    !46,    !47,    !48
        Flags:    (*) Active, (!) Disabled, (g) Load Sharing port
                  (b) Port blocked on the vlan, (m) Mac-Based port
                  (a) Egress traffic allowed for NetLogin
                  (u) Egress traffic unallowed for NetLogin
                  (t) Translate VLAN tag for Private-VLAN
                  (s) Private-VLAN System Port, (L) Loopback port
                  (x) VMAN Tag Translated port
                  (G) Multi-switch LAG Group port
                  (H) Dynamically added by MVRP
                  (D) TRILL Designated, (A) TRILL Appointed Forwarder
                  (I) Dynamically added by IDM
                  (U) Dynamically added uplink port
                  (V) Dynamically added by VM Tracking

* X480-48t.1.17.37 #  config vlan "Default" delete ports all

* X480-48t.1.17.38 # show vlan "Default"
VLAN Interface with name Default created by user
    Admin State:         Enabled     Tagging:   802.1Q Tag 1
    Description:         None
    Virtual router:      VR-Default
    IPv4 Forwarding:     Disabled
    IPv4 MC Forwarding:  Disabled
    Primary IP:          172.16.1.103/24
    IPv6 Forwarding:     Disabled
    IPv6 MC Forwarding:  Disabled
    IPv6:                None
    STPD:                s0(Disabled,Auto-bind)
    Protocol:            Match all unfiltered protocols
    Loopback:            Disabled
    NetLogin:            Disabled
    OpenFlow:            Disabled
    TRILL:               Disabled
    QosProfile:          None configured
    Egress Rate Limit Designated Port: None configured
    Flood Rate Limit QosProfile:       None configured
####

Dec 4, 2015

エクストリーム・ネットワークス:vlan のコンフィグ(XOS)

このポストでは、vlan のコンフィグについてご紹介したいです。

今回のトポロジーは下記のようなものとなります。
2 台のスイッチは、ポート 3 で接続しております。
 [PCA] ---- [Port5]Switch 1 [Port3]  ------------ [Port3] Switch2[Port5] ---- [PCB]
                                172.16.103.103/24           172.16.103.102/24


#### 実機の例 ####
//1. 新しいVlan を作成する、このVlan の名前は Data, VID は 10 となる//

* X480-48x.1 # create vlan Data tag 10


//2. Port 5 に untagged vlan をアサインする//
* X480-48x.2 # config vlan "Default" delete ports 5

* X480-48x.3 # config vlan Data add ports 5 untagged
* X480-48x.5 # show vlan
-----------------------------------------------------------------------------------------------
Name            VID  Protocol Addr       Flags                         Proto  Ports  Virtual
                                                                              Active router
                                                                              /Total
-----------------------------------------------------------------------------------------------
Data            10   ------------------------------------------------- ANY    0 /1   VR-Default
Default         1    172.16.103.103 /24  ------------T---------------- ANY    2 /46  VR-Default
Mgmt            4095 ------------------------------------------------- ANY    1 /1   VR-Mgmt
-----------------------------------------------------------------------------------------------


//3. Port 3 に tagged vlan をアサインする//
* X480-48x.6 # config vlan "Data" add ports 3 tagged
* X480-48x.12 # show vlan ports 3
-----------------------------------------------------------------------------------------------
Name            VID  Protocol Addr       Flags                         Proto  Ports  Virtual
                                                                              Active router
                                                                              /Total
-----------------------------------------------------------------------------------------------
Data            10   ------------------------------------------------- ANY    1 /2   VR-Default
Default         1    172.16.103.102 /24  ------------T---------------- ANY    1 /47  VR-Default
-----------------------------------------------------------------------------------------------

* X480-48x.14 # show vlan ports 5
-----------------------------------------------------------------------------------------------
Name            VID  Protocol Addr       Flags                         Proto  Ports  Virtual
                                                                              Active router
                                                                              /Total
-----------------------------------------------------------------------------------------------
Data            10   ------------------------------------------------- ANY    1 /2   VR-Default
-----------------------------------------------------------------------------------------------


//4. Swich1 と Switch 2 の Data vlan に ip address をアサインする //

* X480-48x.15 # unconfig vlan "Default" ipaddress
* X480-48x.16 #
* X480-48x.16 # config vlan "Data" ipaddress 172.16.103.103/24
IP interface for VLAN Data has been created.

* X480-48x.19 # show vlan
-----------------------------------------------------------------------------------------------
Name            VID  Protocol Addr       Flags                         Proto  Ports  Virtual
                                                                              Active router
                                                                              /Total
-----------------------------------------------------------------------------------------------
Data            10   172.16.103.103 /24  ----------------------------- ANY    1 /2   VR-Default
Default         1    --------------------------------T---------------- ANY    2 /46  VR-Default
Mgmt            4095 ------------------------------------------------- ANY    1 /1   VR-Mgmt
-----------------------------------------------------------------------------------------------


* X480-48x.15 # unconfig vlan "Default" ipaddres
* X480-48x.17 # config vlan "Data" ipaddress 172.16.103.102/24

####

エクストリーム・ネットワークス:スイッチ間の接続(XOS)

このポストでは、2 台スイッチ間の接続について、ご紹介したいと思います。

今回のトポロジーは下記のようなものとなります。
2 台のスイッチは、ポート 3 で接続しております。
 Switch 1 [Port3]  ------------ [Port3] Switch2
      172.16.103.102/24           172.16.103.103/24

##### 実行例 ######
// 1. 2台 のスイッチのPort 3 を Enable する//
* X480-48x.1 # enable port 3


// 2. 現在の vlan の状態を確認する //

* X480-48x.1 # show vlan
-----------------------------------------------------------------------------------------------
Name            VID  Protocol Addr       Flags                         Proto  Ports  Virtual
                                                                              Active router
                                                                              /Total
-----------------------------------------------------------------------------------------------
Default         1    --------------------------------T---------------- ANY    1 /48  VR-Default
Mgmt            4095 ------------------------------------------------- ANY    1 /1   VR-Mgmt

ご覧の通り、スイッチのDefault vlan は "vlan 1" に所属しております。


// 3. Default vlan に IP addresss をアサインする //
* X480-48x.2 # config vlan "Default" ipaddress 172.16.103.102/24
IP interface for VLAN Default has been created.

* X480-48x.4 # config vlan "Default" ipaddress 172.16.103.103/24
IP interface for VLAN Default has been created.


//4. 設定した内容を確認する //
* X480-48x.3 # show vlan
-----------------------------------------------------------------------------------------------
Name            VID  Protocol Addr       Flags                         Proto  Ports  Virtual
                                                                              Active router
                                                                              /Total
-----------------------------------------------------------------------------------------------
Default         1    172.16.103.102 /24  ------------T---------------- ANY    1 /48  VR-Default
Mgmt            4095 ------------------------------------------------- ANY    1 /1   VR-Mgmt
-----------------------------------------------------------------------------------------------


----------------------------------------------------------------------------------------------
Name            VID  Protocol Addr       Flags                         Proto  Ports  Virtual
                                                                              Active router
                                                                              /Total
-----------------------------------------------------------------------------------------------
Default         1    172.16.103.103 /24  ------------T---------------- ANY    2 /47  VR-Default
Mgmt            4095 ------------------------------------------------- ANY    1 /1   VR-Mgmt
-----------------------------------------------------------------------------------------------


// 5. Ping テストを実施する //
* X480-48x.4 # ping vr "VR-Default" 172.16.103.103
Ping(ICMP) 172.16.103.103: 4 packets, 8 data bytes, interval 1 second(s).
16 bytes from 172.16.103.103: icmp_seq=0 ttl=64 time=9.400 ms
16 bytes from 172.16.103.103: icmp_seq=1 ttl=64 time=1.054 ms
16 bytes from 172.16.103.103: icmp_seq=2 ttl=64 time=1.016 ms
16 bytes from 172.16.103.103: icmp_seq=3 ttl=64 time=1.063 ms

--- 172.16.103.103 ping statistics ---
4 packets transmitted, 4 packets received, 0% loss
round-trip min/avg/max = 1/3/9 ms

Dec 3, 2015

エクストリーム・ネットワークス:Mirroring Port

このポストでは、Mirroring port についてご紹介したいと思います。

#### 例 ####
* X480-48x.2 # show mirror

DefaultMirror   (Disabled)
    Description:    Default Mirror Instance, created automatically
    Mirror to port: -

Mirrors defined:          1
Mirrors enabled:          0 (Maximum 4)
HW filter instances used: 0 (Maximum 128)
HW mirror instances used: 0 ingress, 0 egress (Maximum 4 total, 2 egress)

* X480-48x.4 # enable mirror to port
  port            port
  port-list       egress port list for mirror
* X480-48x.4 # enable mirror to port 6
WARNING: This command will remove VLAN membership from the monitor port.
         Do you want to continue? (y/N) Yes
* X480-48x.5 # config mirror add port 4
* X480-48x.6 # show mirror

DefaultMirror   (Enabled)
    Description:    Default Mirror Instance, created automatically
    Mirror to port: 6
    Source filter instances used :  1
        Port 4, all vlans, ingress and egress

Mirrors defined:          1
Mirrors enabled:          1 (Maximum 4)
HW filter instances used: 1 (Maximum 128)
HW mirror instances used: 1 ingress, 1 egress (Maximum 4 total, 2 egress)

エクストリーム・ネットワークス:show version について (XOS)

このポストでは、Show version の内容についてご紹介したいと思います。


### 例 ###
* X480-48t.1.17.35 # show version
Switch      : 800273-00-04 1022G-00079 Rev 4.0 BootROM: 2.0.0.9    IMG: 15.5.3.4
PSU-1       : Internal PSU-1 800282-00-04 1026K-81438
PSU-2       :

Image   : ExtremeXOS version 15.5.3.4 v1553b4 by release-manager
          on Fri Nov 7 12:56:24 EST 2014
BootROM : 2.0.0.9
Diagnostics : 6.3
* X480-48t.1.17.36 #


エクストリーム・ネットワークス:スイッチマネジメント(XOS)

このポストでは、スイッチマネジメント(XOS) について、簡単に紹介したいです。


//  Port コンフィグについて//
 - enable port
 - disable port
 - configure auto speed <10 10000="" 1000="" 100="" or=""> duplex
 - show port configuration


// Default 設定 //
 - Auto Negotiation enable
 - Auto Polarity enable
 - Port's are enable or disable by the "safe defaults script" on initial login

"Auto Polarity" は、逆向きに接続されたケーブルの補正をカードで行うことを意味する。
デフォルト設定の ON を OFFに設定することによって、極性の補正をディセーブルにします。


// Syslog の設定について//
 - configure syslog {add} [ or ] {vr} [local0 ... local7] {}

### Example ###
X480-48t.1.17.21 # config syslog add 1.1.1.1 local0

* X480-48t.1.17.24 # enable syslog

* X480-48t.1.17.26 #
* X480-48t.1.17.26 # show log config target syslog
Log Target      : syslog; 1.1.1.1:514 (vr VR-Mgmt), local0
    Enabled     : yes
    Filter Name : DefaultFilter
    Match regex : Any
    Severity    : Debug-Data (through Critical)
    Format      : PRI Mmm DD HH:MM:SS TAG:
###

CLI session で、リアルタイムを表示させるため、下記のコマンドをご使用してください。

Console session の場合
- enable log display

Telnet and SSH2 session の場合
- enable log target session
- enable log display


// SNMP の設定について//
* X480-48t.1.17.29 # config snmpv3 add ?
  access          Access
  community       Community
  filter          Filter
  filter-profile  Filter Profile
  group           Group
  mib-view        MIB View
  notify          Notify
  target-addr     Target Address
  target-params   Target Params
  user            User

### 例 ####
* X480-48t.1.17.30 # config snmpv3 add user trainer authentication md5 password privacy password

* X480-48t.1.17.33 # show snmpv3 user trainer

Engine-ID       : 80:00:07:7c:03:00:01:30:10:3b:1c 'H'
User Name       : trainer
Security Name   : trainer
Authentication  : HMAC-MD5
Privacy         : DES
Storage Type    : NonVolatile
Row Status      : Active
####


Nov 27, 2015

エクストリーム・ネットワークス: SSH の設定 (XOS)

このポストでは、SSH の設定方法について、ご紹介したいです。


XOS では、SSH を使用するため、SSH2 XOS module が必要でございます。

### 実機の例 ###
!!! 1.  スイッチの中に SSH2 model があるかを確認する !!!
Demo-X480-48t.1.2 # show version images
Card  Partition     Installation Date        Version     Name      Branch
------------------------------------------------------------------------------
Switch primary   Wed Nov 11 01:51:07 UTC 2015 15.5.3.4 summitX-15.5.3.4.xos v1553b4
Switch secondary Thu Nov 26 12:47:36 UTC 2015 16.1.1.4 summitX480-16.1.1.4.xos 16.1.1.4

!!! 2.  XOS module は、active partition にインストールする !!! 
Demo-X480-48t.1.3 # show switch
:
Current State:    OPERATIONAL
Image Selected:   primary
Image Booted:     primary
Primary ver:      15.5.3.4
Secondary ver:    16.1.1.4

!!! 3. 該当 のSSH modules をダウンロードする !!!
Demo-X480-48t.1.6 # download image xx.xx.xx.xx summitX-15.5.3.4-patch1-2-ssh.xmod vr "VR-Mgmt"
Debug information files are present in internal-memory.
These files will be removed if you continue with download.
Do you want to continue with download and remove existing files from internal-memory? (y/N) Yes
Do you want to install image after downloading? (y - yes, n - no, - cancel) Yes

Downloading to Switch....
Installing to primary partition!

Installing to Switch............................................................
SSL will be usable after restart of thttpd process. Restart snmpMaster process to use AES/3DES users for SNMPv3.


Image installed successfully


!!! 4. 下記のプロセスを restart する !!!
Demo-X480-48t.1.7 # restart process "thttpd" 
Step 1: terminating process thttpd gracefully ...
Step 2: starting process thttpd ...
Restarted process thttpd successfully

Demo-X480-48t.1.8 # restart process "snmpMaster" 
Step 1: terminating process snmpMaster gracefully ...
Step 2: starting process snmpMaster ...
Restarted process snmpMaster successfully


!!! 5. SSH をインストールされることが確認する !!!
Demo-X480-48t.1.9 # show version images
Card  Partition     Installation Date        Version     Name      Branch
------------------------------------------------------------------------------
Switch primary   Wed Nov 11 01:51:07 UTC 2015 15.5.3.4 summitX-15.5.3.4.xos v1553b4
Switch primary   Fri Nov 27 11:32:01 UTC 2015 15.5.3.4 summitX-15.5.3.4-patch1-2-ssh.xmod v1553b4-patch1-2
Switch secondary Thu Nov 26 12:47:36 UTC 2015 16.1.1.4 summitX480-16.1.1.4.xos 16.1.1.4


!!!6. SSH model を active !!!
Demo-X480-48t.1.11 # run update


!!!7. SSH2 を Enable する !!!
Demo-X480-48t.1.13 # enable ssh2
WARNING: Generating new server host key
This could take approximately 10 minutes and cannot be canceled.  Continue? (y/N) Yes
.......................................


!!!8. SSH2 を enable することが確認する !!!
* Demo-X480-48t.1.16 # show management
CLI idle timeout                 : Disabled
CLI max number of login attempts : 3
:
Telnet access                    : Enabled (tcp port 23 vr all)
                                 : Access Profile : not set
SSH access                       : Enabled (Key valid, tcp port 22 vr all)
###

エクストリーム・ネットワークス: システムイメージのダウンロード(XOS)

このポストでは、システムイメージのダウンロード方法について紹介したいです。


### 実機の例 ###
!!! 現在イメージのVersion を確認する !!!
Demo-X480-48t.1.1 # show switch
Current State:    OPERATIONAL
Image Selected:   primary
Image Booted:     primary
Primary ver:      15.5.3.4
Secondary ver:    15.7.1.4


!!! TFTP(xx.xx.xx.xx) から、イメージをダウンロードする !!!
* Demo-X480-48t.1.7 # download image xx.xx.xx.xx summitX480-16.1.1.4.xos vr "vr-mgmt"
!!! また、download image xx.xx.xx.xx vr "VR-Default" [primary or secondary] !!!

Debug information files are present in internal-memory.
These files will be removed if you continue with download.
Do you want to continue with download and remove existing files from internal-memory? (y/N) Yes
Note: The inactive partition (secondary) will be used for installation.
Do you want to install image after downloading? (y - yes, n - no, - cancel) Yes

Downloading to Switch...........................................................................................................
Installing to secondary partition!

Installing to Switch...................................................................................................................................................................................................................................................................................................................................................
Image installed successfully
This image will be used only after rebooting the switch!


!!! イメージのダウンロードができるかどうかを確認する !!!
* Demo-X480-48t.1.8 # show switch
Current State:    OPERATIONAL
Image Selected:   secondary
Image Booted:     primary
Primary ver:      15.5.3.4
Secondary ver:    16.1.1.4


!!! スイッチの再起動 !!!
* Demo-X480-48t.1.9 # reboot


!!! 再起動後、イメージを変更したこと、再度 "show switch"  で確認できる !!!
Demo-X480-48t.1.1 # show switch
:
Current State:    OPERATIONAL
Image Selected:   secondary
Image Booted:     secondary
Primary ver:      15.5.3.4

Secondary ver:    16.1.1.4
####


※)”user image [primarily or secondary] を使い、イメージの選択ができる”
#### 例 ####
Demo-X480-48t.1.2 # use image primary

This image will be used only after rebooting the switch!
* Demo-X480-48t.1.9 # reboot
Do you want to save configuration changes to currently selected configuration
file (mgmt-labswA.cfg) and reboot?
(y - save and reboot, n - reboot without save, - cancel command) Yes


Demo-X480-48t.1.1 # show switch
Image Selected:   primary
Image Booted:     primary
Primary ver:      15.5.3.4
Secondary ver:    16.1.1.4

#####